Saturday, February 1, 2020

Refashion Runway, Week 2: 1970's Challenge, contestant Michelle Paganini

Hello, I am Michelle Paganini.  You may already know me from Paganoonoo, or appearances on the syndicated PBS TV show It's Sew Easy, or my upcycle sewing YouTube tips.

Lucky me! I juried into Refashion Runway hosted by Beth Huntington a.k.a. "The Renegade Seamstress. It is an online 6 week challenge to refashion with the emphasis for each week selected in advance, much like Project Runway. There is winner each week, based on votes (like yours) 50%, and 50% judges choice.  You can vote for your favorites once a day, every day, Sat - Friday.

We started last week with 15 contestants.  The challenge was "statement sleeves" and I tied for 3rd!  See full details on my sleeve refashion entry on this blog post, and all the contestant entries here.

Week 2 the challenge is "1970's".  

I was actively sewing much of my high school wardrobe in the 1970's so the first place I turned to for inspiration was sewing patterns, what memories!!! 

When I was in grade school I received a canvas bank bag (remember those?) full of buttons from my Great Grandmother.  As stated above I found a set to use on the vest I made from this pattern.  I loved that vest!!!!  I was slender then and a perfect fit for the patterns as a result. The vest fit me so well that I did not need to wear a bra, lol.  Would never happen now. 

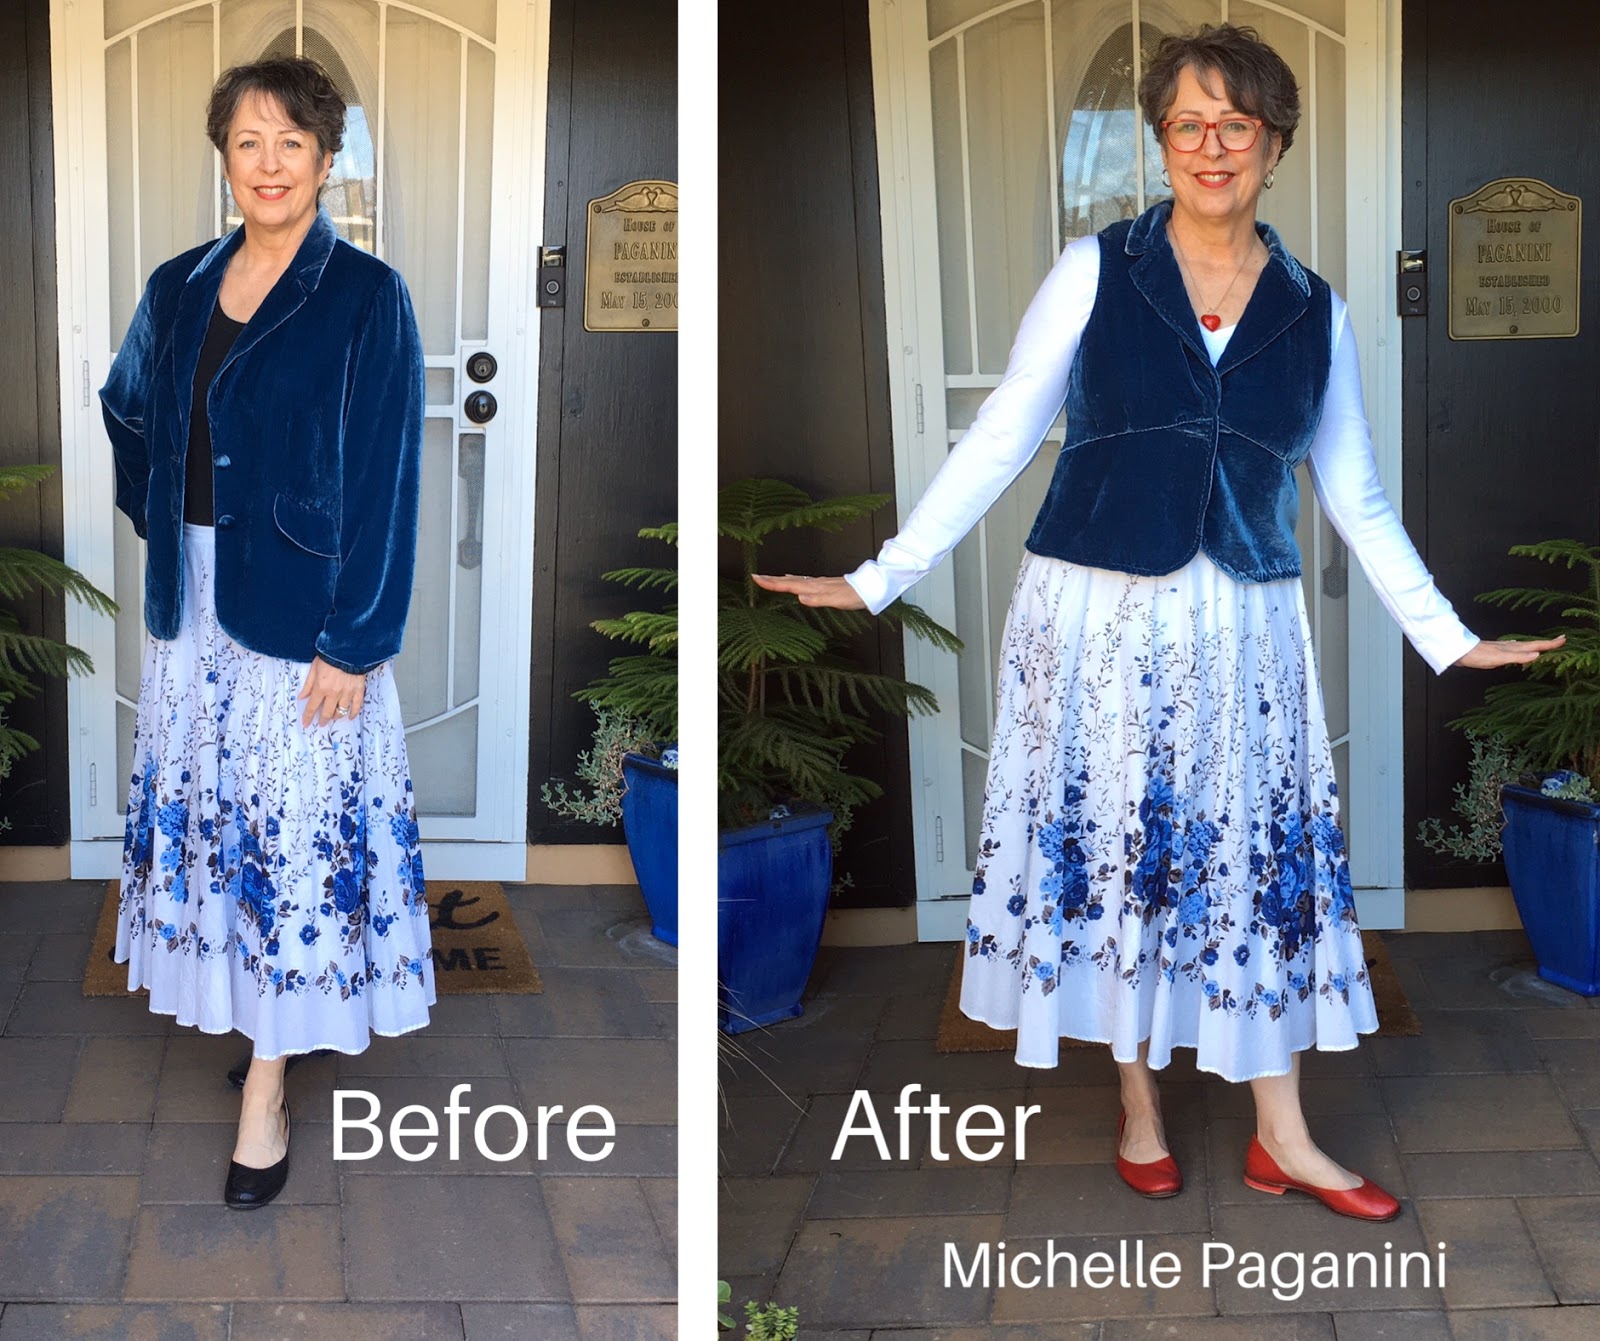
Once I saw the vest pattern I knew I wanted to make a vest, and make it from an existing jacket, as I have done in the past.  I had a very oversized silk/rayon velvet jacket in my stash in a beautiful shade of blue/slightly teal.  Preferring to keep as many existing features from the starting garments as possible, I thought the lines were similar enough to the pattern to work. 


The skirt is a bias cut dirndl and a terrific color match for the jacket. It was also very oversized.

This garment was quite a challenge. I had never sewn with velvet before.  I think I had tossed the jacket in the washer and drier when I first purchased it (something I almost always do no matter the fabric) because the lining was far too big for the jacket.  I removed it entirely and it frayed terribly so did not seem worth trying to add back in and the end. The velvet still looked great.
As I unpicked most of the seams I could see that any machine stitching left permanent marks. Given the liquid nature of velvet it was tough to reshape the seams without stitching and trying the garment on to check fit.  I ended up doing quite a bit of hand basting.  It took 2 days to wrestle the shape into what I wanted.  Whew!  Would have been easier to have a friend help pin fit. 
The collar was floppy, and the velvet layers shifted around. It was even worse once the lining was removed. I check my stash of thrifted embroidery thread and found a perfect color match, then topstitched around the edges of the collar to hold the layers in place. I repeated the top stitching on other seams to help control the lay of the velvet and for decorative reasons. 
 
I added 4 snaps as closures on the vest. The jacket had 2 self covered velvet buttons that could have been added back on as a decorative element, but they just did not look good so the front was left plain. 

As you can see from my collection, I never pass up a vintage (or modern) set of snaps at thrift stores, estate sales, etc.  I have an identical cigar box full of hooks.  Thrifted notions can be better quality and less expensive than those found in big box fabric stores.  See my YouTube tip on thrifted notions.

I took about 6" of width off of the skirt, which improved the fit, although it is hard to see a difference in the photos.  

Overall I am very pleased with the result.  It looks so simple in the photograph compared to the effort it took to achieve the result!  
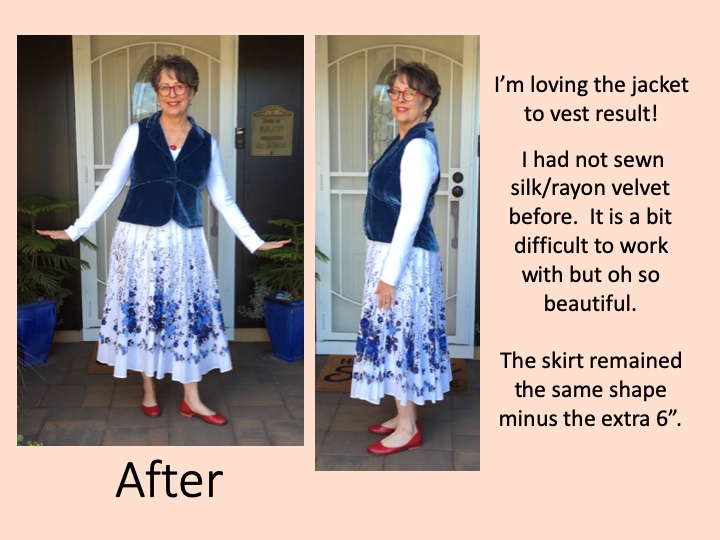
You may recognize the Marlo Thomas pattern cover pose, hand out and flat to the ground.  The illustrations on those patterns were so charming.
I hope you love the results too and vote for my entry!  To vote you must scroll all the way to the bottom of the post until you see a list of names, click a name and then scroll down and click vote.

This time I am up against some formidable competition, particularly the coats made by Diane and Peggy which to my eye are spot on for the era.  

The lady that won last time makes amazing results and works by harvesting fabric from existing garments (or this time a couch) and using it like regular flat fold cloth. I am seeing that I have a bias towards refashions/upcycles that retain original features.  It feels a bit like cheating to me to use just fabric bits. That said, I'm not sure exactly why it occurs to me like that.  Anything that causes discarded textiles material to be reused is fantastic!  Applause for all of the contestants!

What's coming in the next weeks?  3) Faux Fur,  4) Small to Large, 5) Southwest, and 6) Kentucky Derby Hats.

P.S.  Find out more about Michelle and shop Paganoonoo upcycle sewing designs at www.paganoonoo.com 

P.P.S.  Create simple upcycle sewing projects with free video tips!  I show you how to add a double color to a dress shirt, combine color and pattern with confidence, shorten sleeves to ¾ and add a decorative cuff, and more!  Register for free today!

Saturday, January 25, 2020

Refashion Runway 2020, Week 1: Statement Sleeves by Michelle Paganini / Pattern Hack for Paganoonoo "Patti"

Every SATURDAY during the contest, starting January 25, 2020, a new challenge week will begin. There will be a winner each week, based on votes (like yours) 50%, and 50% judges choice.  You can vote for your favorites 
Hello, I am Michelle Paganini.  You may already know me from Paganoonoo, or appearances on the syndicated PBS TV show It's Sew Easy, or my upcycle sewing YouTube tips.

Lucky me! I juried into Refashion Runway hosted by Beth Huntington. It is an online 6 week challenge to refashion with the emphasis for each week selected in advance, much like Project Runway. Week one's challenge is "Statement Sleeves".

One of the things I am really enjoying about participating in this challenge is that it has me focus on projects that I would not normally have selected.

My initial thought for the sleeve challenge was to be literal (given that I am a nerd engineering type with lipstick) and stamp an actual statement on a sleeve.  I pulled out my turn-of-the-last-century alphabet stamp set and tested it with a fabric ink pad.  I even looked up some quotes to consider. Decided to save that approach for another day.


To find out what I did watch this video and/or read below:

Next I turned to my ever growing collection of vintage linens.  What if I used some lace and beautiful pieces to embellish a sleeve?  A classic men's dress shirt is one of my favorite mediums to upcycle. I selected a thrifted solid-color light-gray shirt so the color play between the shirt and the embellishments would be subtle, and the lace/linens details noticeable without competition from a print. (Click here for my video tip on color and pattern selection.)

My experience with men's shirts is that when I remove the cuff, the sleeve length is just shy of full length.  Also because the pleat is released from the cuff, the sleeve bottom becomes a bit wider.  After removing the cuff and looking at the result, I wanted even more flare.  Solution?  Add a godet in the sleeve placket using the cuff corner, as seen in the picture above.  Space for a second godet was created by making a pinked cut along the underarm seam and inserting the other cuff corner as seen in the picture below.
 

With the addition of the godets the ends of the sleeves now had a bell shape with a raw pinked edge.  I underlined the cuff with vintage lace, making the length a perfect long sleeve. Using what was left of the lace, I edged the collar, creating balance with the sleeves.

To finish the "statement" part of the embellishment, I selected two identically styled but different shaped doilies, a rectangle and an oval. They were too delicate to look nice with machine stitching (and difficult to access with a machine), so I hand stitched them in place.
 
The shirt fit my bust, but would not button across my hips/belly, a typical problem for my pear shaped figure.  I now had a button down shirt with a feminine sleeves and collar but not a very feminine bodice 

Solution? I turned to my favorite upcycle sewing design, the Paganoonoo Patti, and added a swing back to the garment. A thrifted pajama top of soft lightweight cotton provided the perfect fabric to create the back panel, with the bonus of an existing hem!  The bottom of the shirt now flared out for a much more feminine silhouette.

The front of the shirt now had the right silhouette, but was out of balance with the embellished sleeves and collar, needing a more feminine touch. It had been silkscreened with a few white overlapping circles in a workshop I took with Holly Badgley at PenWAG (Peninsula Wearable Arts Guild, Campbell, CA), but that was not quite enough.  I added a collection of mis-matched non-functional buttons on the placket.  Perfection!

The Paganoonoo Patti design is my favorite, simple and elegant, with plenty of hip and belly room.  I am in love with with this sweetly feminine "Statement Sleeve" version.  

I hope you love it too and vote for my entry!
What's coming in the next weeks?  

2) 1970’s - A tough one even though I lived through them, lol, then...

3) Faux Fur,  4) Small to Large, 5) Southwest, and 6) Kentucky Derby Hats.

P.P.S.  Find out more about Michelle and shop Paganoonoo upcycle sewing designs at www.paganoonoo.com 

P.P.S.  Create simple upcycle sewing projects with free video tips!  I show you how to add a double color to a dress shirt, combine color and pattern with confidence, shorten sleeves to ¾ and add a decorative cuff, and more!  Register for free today!

Tuesday, January 14, 2020

Refashion Runway 2020 Contestant! Michelle Paganini


After 5 years creating upcycled designs for Paganoonoo and translating them into sewing instructions for other stitchers, I’ve developed a tool box of techniques. I love all my designs and see them as classics with an arty twist. I love that Paganoonoo designs flatter all types of figures.  

If you don't know me from Paganoonoo, you may know me from appearances on “It’s Sew Easy” a syndicated PBS TV show or my own YouTube video sewing tips. More info at www.paganoonoo.com 

And, as with many artists, I crave time to create, and explore new perspectives. Lucky me! I juried into Refashion Runway hosted by Beth Huntington. It is an online 6 week challenge to refashion, with the emphasis for each week selected in advance, much like Project Runway. There are 15 contestants!  If you would like to see previous seasons, check out Beth’s retrospective post. 

Whether you call it refashioning, upcycling, or something else, creating new fashions out of existing clothing makes sense for the budget and for the planet. Bonus factor - creativity!  I enjoy the challenge of working with 3D garments and the opportunity for creative problem solving and experimentation.

We will start with 1) Statement Sleeves, then follow with  2) 1970’s, 3) Faux Fur,  4) Small to Large, 5) Southwest, and 6) Kentucky Derby Hats.  

For me growth occurs mostly when I'm in the uncomfortable place of facing the unknown and acting anyway, risking looking foolish. As a previously self declared "Upcycle Sewing Guru" with quite a bit of experience, I'm both confident and fearful - how embarrassing would it be to wash out early?  How great would it be to do well and develop new skills? 

Flop, survive, or thrive - I'm in with 14 other talented ladies.  Shout out to my friend and fellow contestant Diane Sladowski, who creates amazing upcycle denim pieces. 

Do I hope you love my designs? Yes! Would I love your support? Yes!   

There will be a winner each week, based on votes (like yours) 50%, and 50% judges choice.  You can vote for your favorites at www.therenegadeseamstress.com starting January 25, 2020.


P.S. speaking of sleeves - I have a free video tip on how to add a turned cuff to a dress shirt.  Great for making ¾ sleeves!

Wednesday, January 1, 2020

Thoughts on the New Year, 2020, reflections on 2019


For me, every new year is informed by what happened the year before.  Here are some of the highlights I've been thinking about from 2019:
  • Paganoonoo was started 5 years ago!  My article in Threads Magazine came out in very early 2015. Many patterns and shows later, along with It's Sew Easy TV appearances, Paganoonoo is still going strong. I remain passionate about upcycling.
  • George and I had a harrowing trip in the snow to get to the Puyallup, WA, Sewing and Stitchery Expo in March.  We ran into a 60 year storm right around Ashland Oregon and made it over the Siskiyou pass literally minutes before it was shut down.  After being taken in for the night by angels in human form we gratefully completed the trek, safe and sound. As usual, it was a treat to be with everyone at the Expo.

    • I retired from my 40 year career in Medical Devices in June, after spending the last 17 years as an expert consultant on FDA's Quality System Requirements (21CFR 820 for fellow nerds.)  I am grateful for the skills I learned that serve me very well in running Paganoonoo.  It was a privilege to work in an industry that makes a positive difference for people in need. After 5 years running two businesses in parallel I am grateful to have just one to manage.
    • Paganoonoo Ready2wear (Etsy) was launched to sell upcycled garments. I really wanted to use the extra time after I retired to do more sewing.  Online sales have not worked so far, in person sales have been much better.  Loved the sewing time!!!
    • After a break in producing Paganoonoo video tips, we have started again.  Feedback has been terrific.  George is great at filming and I am honing my editing skills. I've had a long term goal of opening an online upcycle sewing school and still plan to make it happen.  Look for another TV appearance on It's Sew Easy, releasing in March.
    • I was on the board of 2 non-profits, my wearable art guild, www. PenWAG.org, and www.happydragonthriftshop.com.  Both great causes and a bit related to sewing, upcycling, creating, saving things from the landfill.
    • Episodes of depression and anxiety are part of my life.  Overloading myself is not particularly helpful.  It helps when I keep in place the practices I know to do that make a difference.  Frustration and wishing it away is not effective.  
    Thoughts going into 2020:

    I've been reflecting on what is most important to me, and how I want to allocate my time and energy.  A friend talked with me about using the following filters to focus for 2020:
    • What do I value?  What do I want to get out of life? What gives me energy/ juice?
    • What is already operating and "in motion" in my life?  Do I still wish to participate?  How much time/ energy do I want to invest? What do I want to Add/ Change/ Delete?
    • When things are being Added, Changed, Deleted what does that transition look like? 
    In the process of 2020 planning, and there are some things that have become clear.
    • The opportunity to create is extremely important to me. I am looking forward to taking a Surface Design Sabbatical starting in March!  For some years I have been wanting to explore upcycling not just through deconstruction and reconstruction, but also through surface design, so allocating this time is a dream come true. 
    • There have been hints of this passion with my button accents.  I've been inspired by the work of #TessaPerlow, a masterful embroiderer, among others. I plan to embroider, paint, stencil, stamp, applique, button, bead, write, etc. using existing garments as a foundation. I anticipate that this sabbatical will provide me with exponential growth and joy!  Timeframe?  6 month minimum, possibly longer.
    What changes in the transition? 

    I am structuring my life to bring in as much creative energy as possible.

    This is a purposeful strategy to create abundant joy, and to help manage episodes of depression and anxiety.  By the way, it seems to me that for many people there is a correlation between creativity and depression/anxiety.  I would not trade my creativity for ANYTHING, including removal of depression/anxiety.

    Room/ time needs to be made, and I am not fully clear yet exactly how this will happen, except for the following:
    • PaganoonooReady2Wear online will be on hold for now. There will be a blow out sale for existing garments, in person and perhaps Facebook - I need studio space!
    • Developing new Paganoonoo instructions is on hold during the sabbatical.
    • I am considering the possibility of turning over the management of Paganoonoo's day-to-day administration to someone else during the sabbatical.
    • Paganoonoo will do very few shows in 2020.  We will not be at Puyallup, WA for the Expo this year (I will miss you all!).  Will do:
              1) Road To California in Ontario, CA in a few weeks (end January) and 
              2) Canada College's Artistry in Fashion in September 2020
    • I will to do very few teaching gigs other than my commitment for PenWag's October Meeting (Campbell, CA) www.PenWAG.org
    • I will to continue to produce video tips.  I love to share with you want to continue to hone my editing skills!  
    • I will take some workshops from others!  Let me know of opportunities...
    • I will make time to visit and create with friends! Part of this will include "art" parties in person and online (time to learn how Facebook Live works).
    • I will continue on the PenWAG board, this year as the 2020 Speaker Coordinator and program planning for 2021.  
    P.S. I will be a participant in the online "Project Refashion 2020" challenge.  Online hosted by the Renegade Seamstress. Starting in a couple weeks!!! 
      Thank you for being in the upcycling game and life game with me!  I am grateful for you all.  It doesn't matter if you are creative, or creative in the same way that I am.  Artists need admirers and patrons, as we need relationships with people with a myriad of skills we (I) lack and admire (like those of you good at math and staying organized.) 

      What are you thinking about keeping, adding or deleting in 2020?

      As always, you can purchase Paganoonoo Upcycle Sewing Instructions at www.etsy.com/shop/paganoonoo 

      Michelle

      Monday, December 23, 2019

      Recommendation for Sewing Podcast: LOVE TO SEW

      This year I found a sewing podcast I enjoy very much.  At first I thought how could a podcast, with no visuals, be of interest?  Hard to explain how, but it works quite well.
      www.lovetosewpodcast.com

      The hosts, Helen Wilkinson and Caroline Somos are two young Canadian ladies with a lively sense of humor and a true love of sewing. They start out every interview by asking the guest how their sewing journey started.  Love that question!

      Topics include making clothes, the sewing community, and small businesses. They talk about their passion for sewing a handmade wardrobe and their daily lives as creative entrepreneurs. Listen to interviews with indie business owners and inspiring sewists who totally understand your obsession with sewing.  Frequency 1 episode / week

      Here are examples of recent episodes:

      And an episode on refashioning: http://lovetosewpodcast.com/episodes/episode-113-refashioning/ (don't you think they should interview Paganoonoo too?)

      Paganoonoo is sponsoring the Christmas Eve podcast.  The great news is that you can easily access past episodes through the website above. I am still working my way through them.               

      Happy Holidays to You and Yours!   Michelle Paganini
      P.S. Paganoonoo PDF upcycle sewing instructions in discounted holiday bundle packs are available now at www.etsy.com/shop/paganoonoo

      Tuesday, December 10, 2019

      Turned hems with a curve, the easy way

      Hello,

      I am Michelle Paganini, designer for Paganoonoo. Curves are one of my favorite design elements.  They often show up in my designs as high/low hems with a curve in the back.  

      The technique described today is for turned hems, that is hems that are pressed under once, and then pressed under again prior to topstitching. This method creates an easy turned hem. Video link here.  Steps outlined below.

      1) Run a stitch line (large stitch), just inside of where the hem will be turned. Turn the stitching to the inside as you press.  

      Where there is any difficultly turning and pressing due to the curve, pull up the thread from one stitch, slightly gathering the fabric. This makes it easier to turn. Repeat as often as needed.

      1a) Optional - along tight curves make a second row of stitching on the hem, between the raw edge and the first row of stitching.

      2) Tuck the raw edge under, butting up against the turned hem.  If necessary, and when you have stitched the second row described in 1a, pull up one stitch when needed to pull in the curve.  Press.

      3) Topstitch the hem just along the top. 

      4) Optional: pull out the stitch lines as they are no longer needed. 

      5) Give a final press for a professional look.

      Enjoy your curved hem!

      To enjoy more sewing tips with Michelle Paganini subscribe to her YouTube channel.

      Her sewing instructions make upcycle sewing simple.  Find out more at www.paganoonoo.com

      Friday, November 15, 2019

      Hawaiian Shirt Dress Upcycle

      Hello,

      I am Michelle Paganini, owner and designer for Paganoonoo, an upcycle fashion design company.

      I was recently preparing for a vacation, looking over my wardrobe (northern California), and thinking I wanted something different.  I'd just finished sewing up 33 upcycled flannel shirts and we were heading to a tropical location, not a match.


      For quite some time I've been considering transforming a collared shirt into a kimono style by replacing the placket and collar with a band like the kind found on kimonos.  This was the perfect opportunity!

      I started with a rayon Hawaiian shirt my husband no longer wanted.  It was quite oversized on me, but rayon drapes so nicely I thought I could make it work.

      I cut away the placket and the collar such that adding on a 2" band would result in a good fit.  The band was made using scrap fabrics is the same color palette as the shirt. I pieced together various pieces to add interest.

      I wanted a dress more than a tunic so I looked through my (HUGE) stash of garments ready for upcycling and found the perfect piece to add.  A dark indigo gored denim skirt wide enough to match the bottom of the shirt.  Added bonus - it had decent draping qualities, did not wrinkle easily, and the color was a good match.

      Intending to use the preexisting hem, I cut off a bottom section of the skirt.  This skirt panel was added to the bottom of the shirt.  So far, so good, however, I had a sack dress at this point. Having recently lost some weight, I wanted a bit more of a fit.

      An elastic waist with an inside casing seemed like a good solution and it was.  The only thing left to add was closures.  I liked the way the band looked and did not want to add buttons or ties or frogs.  The solution was large snaps and a hook and bar waist closure. I added a flower for fun!

      Current upcycle sewing instructions are available at www.etsy.com/shop/paganoonoo   Upcycle sewing made simple!

      P.S.
      This design could be translated into a new Paganoonoo upcycle sewing instruction.

      Would you be interested?

       
      P.P.S.  Create simple upcycle sewing projects with free video tips!  I show you how to add a double color to a dress shirt, combine color and pattern with confidence, shorten sleeves to ¾ and add a decorative cuff, and more!  Register for free today!

      Friday, October 4, 2019

      Flannel and wool upcycled tops - Paganoonoo Patti design


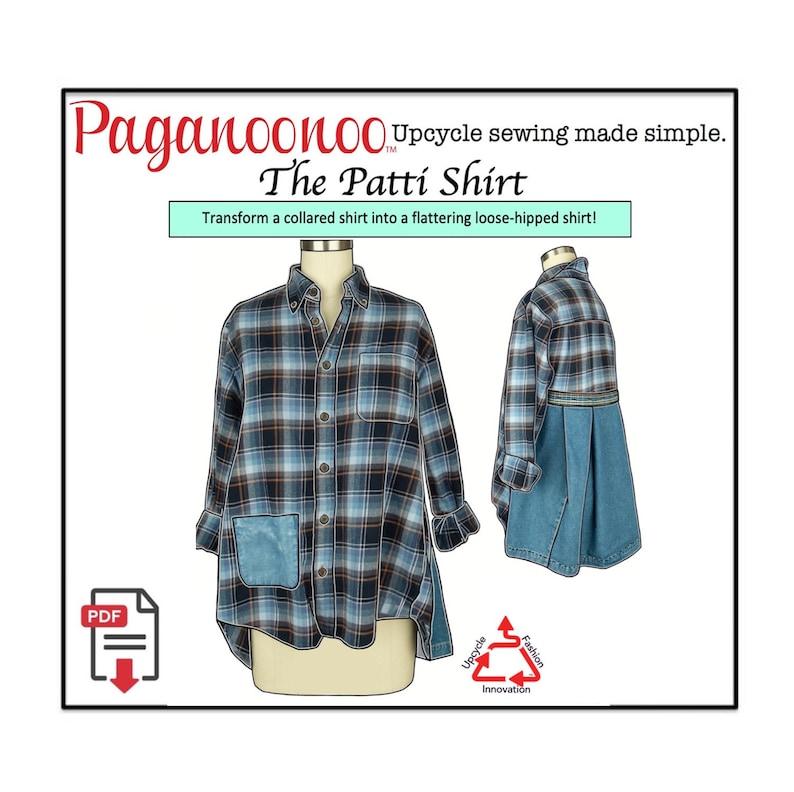
      I've been making upcycled flannel tops for my fall shows, using Paganoonoo Patti upcycle sewing instructions.  Since I am very particular about color and pattern combinations (Paganoonoo video tip here), there have been times where I have been stuck finding a match for the base garment.

      One day I was in my favorite thrift store perusing the men's sweaters looking for cashmere when a lightening bolt hit me.  Merino wool!!!!! I could use Merino wool (and/or cashmere) for the back swing panels.

      When I purchase wool sweaters from the thrift store I put them through a regular wash and full dry cycle.  Do they shrink?  Almost always.  Sometimes I put them through twice and they shrink even more.  The great thing about doing this is that:

      1) The garment they go into is then washable

      2) Any moth holes shrink

      3) I assume any moth eggs are killed

      4) They become felted so raw edges do not ravel

      There are many ways to use felted wool, Paganoonoo video tip here.  I find that 100% cashmere and merino wools shrink less than regular wools, perhaps a couple sizes, not to child size proportions (but do not count on that!)

      General observations:
      • I've found that the ribbing on the bottom makes a great waistband so I turn the pieces upside down a lot.
      • Machine stitching can make the seam ripple.  This effect can be lessened with a good steam pressing. I avoid it altogether by hand sewing the seams. 

        I know, sounds tedious unless you like hand sewing like I do.  I find that this type of wool is the most forgiving type of hand sewing you can do.  Easy to push the needle through, stitches don't show too much if you use matching thread. I use a running stitch and do a double row.
      • Small bits make great patches and motifs.
      Want to upcycle your own Patti blouse?  Purchase instructions today.  Paganoonoo upcycle sewing FAQ (frequently asked questions) answered here.

      Happy upcycling!

      Michelle Paganini

      Thursday, September 19, 2019

      Upcycled Jean Jacket

      After attending a workshop with Christine Mayer (Into the Light) on Upcycling and Japanese draping I chose a new approach to upcycling a jean jacket.

      Christine's silhouette is often a fitted bodice with roomier hips, one of my favorites.

      I began with a traditional jean jacket, opened up the sides, and added bust darts.

      I test pinned darts in place until they looked good.

      Next step - contouring the back.

      I cut vertically along the outsides of the center back panel and pulled in the looser bits, burying the extra under the center back panel.

      Again, test fitting was the key to a good fit. I also ended up with one horizontal cut midway that allowed further contouring.

      The bottom half of the jacket was draped using a few sets of LevisTM.  I chose an asymmetrical flared application banded with waistbands for the hem.

      The variation in denim color is purposeful, as is the placement of the 3 labels in the back.

      Because the bottom half is a combination of pieces the inside looked a bit messy.  I chose to line the bottom with quilting weight cotton.


      I draped the selvedge edge long the waistband top, pinning it in place.  From there I smoothed out the fabric from the top to the sides and bottoms.  It is entirely hand stitched in place.


      A couple folks have suggested they would like this added to the Paganoonoo collection of upcycle sewing instructions.  What do you think?

       View the current collection and find out more about upcycle sewing at www.paganoonoo.com 


      Happy Upcycling!  Michelle


       Purchase Boro-Style Jacket upcycle sewing instructions here