Monday, December 7, 2020

Simple Gifts From Vintage Linens

 Sweet simple gifts are easily made from vintage linens (not being used otherwise!). Those unused dresser scarves made great bags for shoe storage when traveling, ...

or laundry bags, or small bags for misc. goods.

I can tell you from experience that opening up your luggage on the other end of a trip and finding something like this is a welcome sight. 

Of course these could also be used as gift bags, or given as a set of gift bags.  I've found numerous uses for mine.  Hostess gift?  Yes please.


The ties have been made with cashmere yarn, t-shirt yarn, and ribbon. 

Most of these bags are made with minimal sewing with just a few straight lines of stitches. If you have been wondering what to do with (non precious) family linens perhaps these will inspire.

I hope you are well, healthy, happy or getting the support you need to deal with life's inevitable ups and downs.  

Michelle


P. S. to see more gift ideas and other upcycling tips you can enroll in my free upcycle sewing tips class:

https://paganoonoo-upcycle-sewing.teachable.com/courses


Thursday, December 3, 2020

 #duster, #cottagecore, #grandmacore, #cowgirlstyle, #prairiestyle

Recently I used my Michelle pattern and a made dress entirely of men's dress shirts. It turned out too long in the front, so I ruched the front section even with the back hem.  I liked the effect, but now my knees showed!  Not my best feature, hmmmm.

I had some vintage lace* that was donated by friend, yards and yards of it. About 2" long, it would add just what I needed.  So I added lace to the hem.  I had cut the sleeves down and they were awkward - not short but not ¾ length.  I added lace to the sleeves as well to solve the problem and tie in the hemline.

Too lazy to take off my overalls I modeled it on top of them and shared with my facebook group (https://www.facebook.com/groups/Paganoonoo/?ref=share) and they liked it better as a duster than a dress!  Live and learn, lol.

Here it is in all it's glory.  The fabulousness of this design is the endlessly long inverted sleeve pockets.


* BTW the lace had become discolored and yellowed with age. A trick I learned is to soak it in Oxiclean overnight, starting with hot or boiling water.  Worked super well.

Happy Upcycling!


Michelle

Friday, November 20, 2020

Nylon Nightgown Repaired With Cashmere - Michelle Paganini

I just repaired a thrifted nightgown with a patch made from a moth-hole-riddled cashmere scarf.  It started  as a small hole which I ignored. It grew. And grew.  Soon it was more than 12" long, and then a second hole appeared. Although the nightgown was a favorite, I set it aside, thinking it was done.Then I looked at similar nightgowns on eBay.  First of all the color and style were difficult to find and seemed to be quite expensive (for my preferences). Hmmm.

 
I thought of repairing the gown, but with what?  Silk? Hmmm, slippery.

Then my friend Antoinette at Happy Dragon Thrift Shop rescued a moth-hole riddled scarf from going into the rag bin and saved it for me.  She knows that any cashmere, no matter how damaged, I will use. 
I washed the scarf in hot water and dried it in a hot dryer.  I cut out a section and laid it on my ironing board.  I layered the nightgown on top.  Bonus - very little slipping.  Some light pinning and I started to hand stitch. 
 
The long edges of the nightgown's hole curled under, so stitched down quite nicely. There was one hole in the scarf section that I decided to reinforce and leave, just for fun.

I think the cashmere will hold up well and work perfectly.  The remainder of the scarf will become a bed wrap.

Happy Repair and Upcycling!

Michelle Paganini


P.S. - Michelle creates upcycle sewing designs and writes tutorials for home sewists (like a pattern but with no pieces to print a cut.  Super flattering, room for hips and bellies and simple to sew.  www.etsy.com/shop/paganoonoo. The Ellie and Patti are good choices to start.


Sunday, November 1, 2020

Flannel Season!

 Hot chocolate, gloves, hats, sweaters, falling leaves, and flannel.  I love a flannel shirt!  The problem for me is that the hips/belly are always too snug, or just flat out will not button.​ Refashioning is the solution. 


This Paganoonoo refashion design, The "Patti", adds a loose hip and is flattering on all body shapes. 

Fitting is simple - you start with a flannel (or any button down) that already fits your shoulders, bust, and arms - too tight hips - gets fixed.

The sewing instructions are illustrated step-by-step.  This type of refashion requires no pattern pieces to cut out! 

Instead the instructions show you how to cut apart and sew back together the garments you start with (deconstruct & reconstruct.)


You can get professional looking results without having to: 

- set a sleeve, 
- sew a buttonhole,
add a collar 

those things are already done for you!

This version used a denim skirt for the back panel.


The panel in the lower back can be made with another garment such as a shirt, t-shirt, sweater, skirt, or it can be made with stash fabric - any suitable weight material.

This red and purple version used stash quilting cotton for the back panel.  

The band waistband is the placket from another shirt.


The grey back on this Patti was made using a merino wool sweater turned upside down.  The sweater's bottom band now serves as a waistband.

If you have avoided garment sewing because of fitting issues or complicated bits like collars, plackets, and buttonholes then this is the design for you. 

If you would like a bit more room in the hip and belly in your shirts then this is the design for you.

If you would like to try upcycle sewing / refashioning but are not sure how to get started, then this is the design for you.  

This is the simplest of the Paganoonoo designs and the one I always recommend for beginners. Our sewing instructions set you up for success! Refashioning is eco-friendly, easy on the budget, and simpler sewing.

Shop your closet and refashion your existing clothes into a comfortable flattering new top. Start refashioning today!


$16 Digital instructions, PDF file 
(print on home printer, ~14 pages)

$22 Hard copy sent to you by mail


Thursday, October 15, 2020

The Ultimate Crossbody Jean and Belt Bag - DIY class online by Paganoonoo

We all need bags in our lives, why not have them be super cool and hands free?


Love used denim?  Me too.  Years ago I started to use old pairs of jeans to make bags. 

My inspiration came from a single quilt in the 2006 Gees Bend Quilt Exhibit at the DeYoung Museum. 

This quilt had been made by a farm wife who used all her deceased husband's clothing.  So much of their lives was in that quilt! 

I stood in front of it in awe, looking at every worn spot, every stain, every crease, tears in my eyes.

When I thought about making something practical from used garments I thought of bags. Materials?

Jeans are one of the most commonly worn garments on the planet, and used denim is plentiful.

Denim wears well, fades beautifully with age, and is repairable. 
It is literally the perfect choice to make bags that can last a lifetime.  

Over time I found the most practical, durable & successful versions of upcycled bags turned out out to be a crossbody bag with a belt for a strap.  

Great for the farmers market, shopping, day tripping, or traveling, they are indispensable. People love them and are fascinated by the reuse of practical items.

In this course you will save time and money with access to the most effective methods, for making this type of bag, including tips and tools for working with the thick seams in jeans. In 40 minutes you will learn everything you need to know to make your own bags.
I
Click here for 1) a free preview of sample bags and 2) an outline of the curriculum (scroll down on the opening page).


The course is hosted on Teachable and is self paced. You can revisit it as many times as you would like.

The greenest resources we have are those that have already been processed and can be used again.  Start using your resources today!

Enroll Here
P.S.
Yes you may make small batch production runs to sell if you would like to sell. 

P.P.S. No the video class may not be shared with others, selling my courses and designs is how I make my living - thank you.  If you would like to discuss discount pricing for a group viewing then please contact me at michelle@paganoonoo.com to make arrangements.

Friday, August 21, 2020

Variation on Paganoonoo Peggy - vintage tablecloth skirt

Hello,

 I am Michelle Paganini, Owner of Paganoonoo, and upcycle fashion designer.

 It turns out that this dress has been a favorite with all my groups so I thought I would provide a bit more information about it.

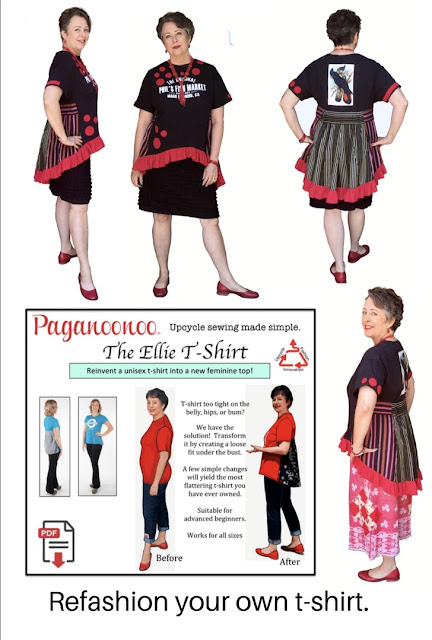
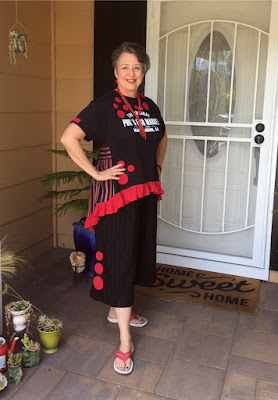
First off, it is a variation on one of my existing Paganoonoo upcycle sewing designs, the Peggy Shirt. My sewing instructions are for sale in my Etsy shop

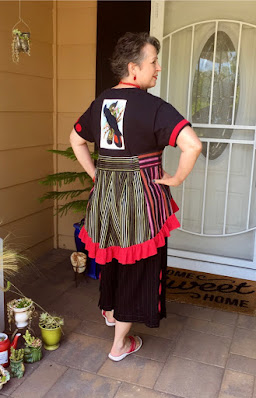
The top half is exactly the same but in this case I used a vintage skirt length tablecloth for the bottom portion.

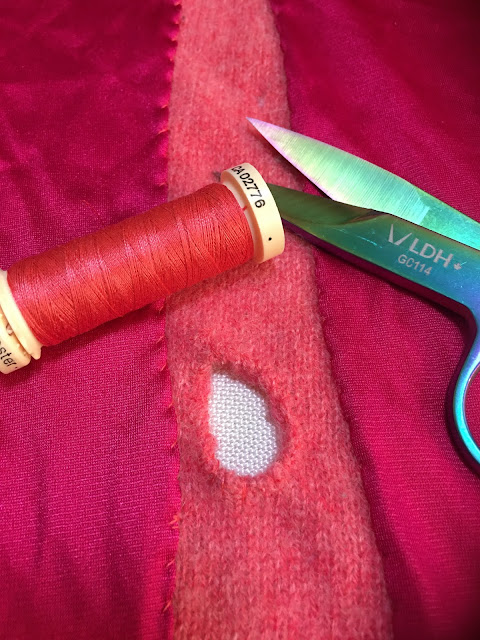
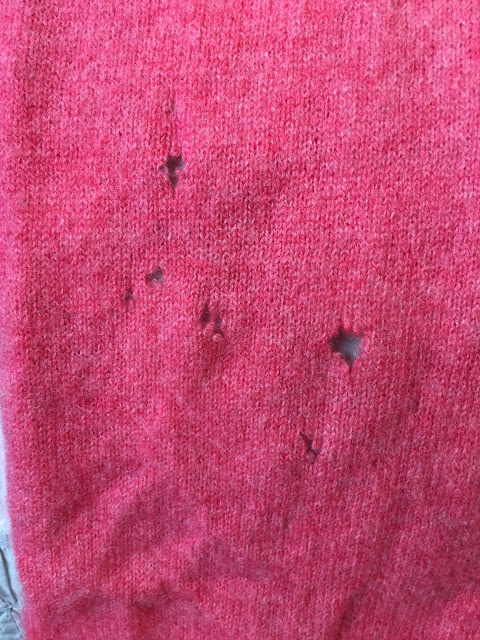
I am in love with vintage linens!  I also volunteer at a thrift store, the Happy Dragon Thrift Shop in Los Gatos, CA, that happens to get the best vintage linens in the Bay Area. Of course we get linens that are not in terrific shape so they do not get put out.  Turns out that this was one of those cases, and Antionette, the chief sorter, knows what I do and saved this piece for me, despite the holes.

What is especially great is that because with was so well used it developed frayed spots which also meant it had been worn into a velvety perfection of cotton softness. Therefore the drape is like a nice rayon!!

I was itching to make something with it and because of the drape I knew it would make a great skirt.  The length was perfect too.  As a very pear-shaped lady I am not overly fond of tucking in shirts so making a dress was a much more appealing option.

My "Paganoonoo Peggy" is ideal for pear and hourglass shapes. Although it is typically made with 3 dress shirts, as shown below, I thought a tablecloth could work and it did.

l draped the skirt section with pleats so it lay nicely on my curves (how did I know? Tried it on and adjusted a bunch).

The join between the top and skirt sections is covered with a flannel shirt placket (the part with buttons and button holes). I made a mock "belt buckle" with a group of buttons. 

I also switched out the white shirt buttons for teal to help tie in the skirt section.  Because I used the entire tablecloth intact for the skirt I needed something else for the cuffs.  I really wanted to tie together the colors so looked though my stash of fabrics and vintage linens.

The best color match was from a vintage unfinished quilt top.  I fashioned a pocket too but did not use it as it spoiled the drape no matter where i placed it.  

The shirt's red is so intense I needed something to break up the back.  I chose a bit of another tablecloth. It seemed slightly off center after I hand sewed in on.  I used a common fall back strategy - add a distraction for the eye.  Check out the button and the top of the patch and then the small cluster on the waistband.  They both add visual weight to the left side, hehe, balancing things out.  

If you would like to make a version of this then you will find my Peggy instructions to be invaluable. What skill set would you need?  Moderate sewing skills with experience in putting together garments and following construction instructions. 

Get started now! Click here for a limited time 15% discount on the DIGITAL version of the Peggy.  Discount good 8/21 - 8/31, no coupon needed.

P.S. I offer a collection of free video upcycle sewing tips here.

Thursday, June 11, 2020

Lagenlook Paganoonoo "Ellie" t-shirt refashion hack

I bought a unisex t-shirt at one of my favorite seafood eateries, Phil's Fish Market in Moss Landing, CA.  I love a black and white graphic T, but found myself not wearing it because even with it oversized on my shoulders, it would hang up on my generous hips. This is a common issue for me. 


The solution is to add flare at the hip.  I used my Paganoonoo "Ellie" refashion instructions with a few hacks and adore the results.

The illustration above shows exactly how a unisex T fits me when the shoulders and bust are the right size for my shape - way tight on the hips and belly.

I chose to make a modified version, more of a Lagenlook profile, to go with some of my palazzo / bloomer pants & pencil skirt.

The hacks to the original design include:

1) added bust darts,

2) the front is cut high making a very high-low hem,

3) added ruffle on the hem,

4) made a horizontal tuck in the sleeves and stitched in place to give a cuff-like effect, also shortening them,

5) and added appliquéd circles (from a felted wool sweater, also used on the pants), and bird panel.
.  
The t-shirt also pairs well with my upcycled vintage linen tablecloth bloomers (modified Tina Given's Jacqueline pattern.) See blog post on bloomers here.


And with a pencil skirt upcycled from a tank top

Here are some in process shots.  I honestly did not think it would turn out at this stage.  The ruffle seemed too shallow, the bright red too disconnected from the rest of the shirt, the black of the base shirt too dull.  Balancing out the color by adding embellishments solved the problem.

I hand stitched the bird patch on.  It had the perfect combination of colors to make the lower back tie in with the upper back.  It was purchased from the Eclipsee Etsy shop (no affiliation or kickback.) Unfortunately this particular bird is now sold out.


I am Michelle Paganini, the designer for Paganoonoo, a company I started that specializes in designing "refashioned" clothing and providing DIY tutorials for home sewists. The "Ellie" is only one of many flattering Paganoonoo designs.  Visit the full collection at www.etsy.com/shop/paganoonoo.