Thursday, December 24, 2015

If you'd like to attend sewing nirvana...


Come join the tens of thousands of fellow stitchers attending the Expo in Puyallup, Washington State, USA.  The show is:

        Thursday Feb. 25, - Sunday Feb. 28. 

Check out the catalog, Sewing and Stitchery Show Catalog 2016, so you can start to plan which seminar(s) you'd like to attend and see the amazing list of vendors. 


The Paganoonoo sessions are titled 1656, Upcycle Sewing! 
and will be given on: 

Thursday @2:30,  
Friday @4:30,  
Saturday @2:30

I'd love to see you there!
Paganoonoo will also have a booth so look for us.

Happy Upcycling,  Michelle

P.S. - Buy currently released patterns here

Tuesday, December 22, 2015

New favorite sewing tool this year

When I was in Puyallup at the Sewing Expo in February earlier this year I found an AMAZING sewing tool, the Quick Ripper, which is a battery powered seam ripper.

P. S. I'm not getting anything out of recommending it.

After 40+ years of sewing I still use a seam ripper constantly. In addition to fixing mistakes, sometimes I'm just disassembling garments for upcycling. This battery powered seam ripper looks like a hair trimmer.


It works reliably and rips through seams very fast. I've saved  hours of hand ripping this year.  I did need to learn how to hold it so the fabric doesn't get ripped.  Wouldn't recommend it for delicate fabrics but it is a dream for most others.

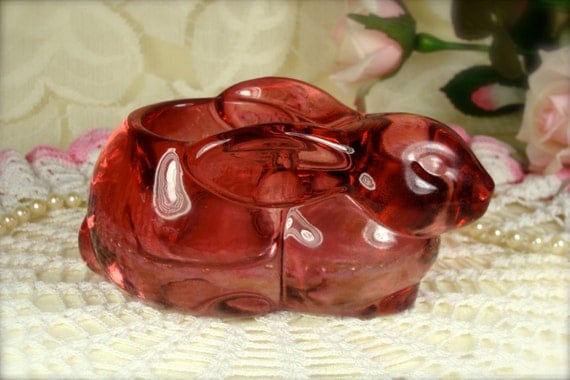
I keep mine next to my sewing machine. It rests in a pink glass bunny just like this:


Don't you just adore a new and useful sewing tool?

Happy upcycling,

Michelle

Wednesday, December 9, 2015

Solutions for zippers that unzip themselves, scratchy tags, and prickly monofilament thread

When I notice I'm not wearing something I start to ask myself why.  Sometimes I'm just avoiding discomfort without even really thinking about it. In some cases all a garment needs is a simple fix to make it wearable again. These are some of my favorite solutions to garment irritants.

Irritant: Pants That Unzip Themselves 
Why do pants unzip themselves when we sit down or bend over?  Usually the top of the zipper is being pulled apart by the structure of the garment/waistband.  When the top of the zipper is pulled into a Y shape it unzips very easily. 

The culprit is often a buttonhole that is too big causing the button opening to shift too far to one side, pulling the top of the zipper into that Y shape. This happens in jeans  as the buttonhole is stretched and worn down over time

Here are the solutions that work for me:  
  • Permanent fix - Shorten the buttonhole. Close the end closest to the front edge so the button can just squeeze through. Use your sewing machine to tack it closed with a zig zag stitch.
  • Temporary fix - In a pinch use a safety pin to pin closed part of the buttonhole.  This can be hazardous if the safety pin is strained too much and opens spontaneously so use this tip at your own risk.
P.S. I've also seen posts for jeans where a metal ring is put through the zipper top and then hooked over the metal button. 

Irritant: Stratchy Tags
"I know what to do!" you say, "just cut them out!" 

But what if you'd like to be able to resell the garment so you need the tag to stay in?  Sew a cover over the tag, then when you are ready to sell remove it. Oh the blessed relief when the tag is covered!


Irritant: Poking Threads

I purchased a new bra recently and when I put it on there was a scratchy area. Darn! You may have noticed that many commercial garments are sewn in part with clear microfiliment thread, like fishing line.  

The pokey bit can hardly be seen but can be felt it against the skin.  Here are the solutions that work for me:  
  • Emory Board:  For pokey bits inside a garment or shoe use an emory board (nail file) to rub it down. The thread can be clipped back, but this often still leaves a sharp bit that needs to be dealt with.
  • Patch:  When an emory board fails to do the trick, put a small patch on top using fabric glue or stitching it in place.  This would probably work for underwires that come out of the bra casing.


Check out my Pinterest board Celebrating Repairs and Mending.

Happy Mending!  Michelle

P.S. - Buy currently released patterns here

If you would like to see new example garments, get links to my video tips, hear about sales, new patterns and events, please click here to be added to the Paganoonoo mailing list, never sold or shared.

Sunday, December 6, 2015

The Original 'Advanced Style' Ladies, San Francisco

Several years ago I was in San Francisco with my husband George having lunch when we spotted The Twins out the window.  
 As always, people were asking to take pictures with them and with gracious patience they posed with every single one of us.  
 I had seen the twins in San Francisco before over the years.  Every time felt magical.  They always dressed alike and with flair.  
 Marian & Vivian Brown were icons of San Francisco as surely as the Golden Gate Bridge.  

 They left us in 2013 and 2014 after bringing joy to probably millions of people.  What a simple gift they gave and what a huge contribution. 

We lost quite a number of family members this year. Each of them contributed in a unique way and is sorely missed.  

With so many losses happening in senseless ways, it reminds me that I should give my best now, and everyday, because you just don't know whose life you touch, the difference you make, and if you will have a chance to do it again.  

Happy Holidays, Michelle  

Friday, December 4, 2015

Persimmon Cookie Recipe, Best Ever!! Happy Holidays


Hello and Happy Holidays!

My friends and neighbors Steve and Sharon have a magnificent 20 tall persimmon tree with huge and beautiful persimmons.  This year, as every year, I've received a bag full of newly harvested persimmons.  I want to share this favorite cookie recipe.

If you haven't made anything with persimmons before you are in for a treat.  These are cake-like drop cookies with a delicate flavor probably closest to pumpkin only better.  They freeze very well and we enjoy them through the spring. Enjoy!

Michelle Paganini’s Persimmon Cookie Recipe (doubles well)

Note: Use the larger persimmons with a pointed end (not doughnut shaped).  They need to be very ripe, translucent under the skin and mushy to the touch or the cookies will be dry and bitter.  Ease the skin off leaving as much pulp as possible -or- if they are ripe enough (completely translucent) you can pull the stem off and squeeze the insides out of the stem hole.

In a large mixing bowl:
Mash 2 cups ripe persimmon to a pulp
   (2-4 depending on size) (it is okay if some strips of persimmon remain) 
Add in:
1 tsp baking powder
2 tsp salt
2 tsp baking soda
1 tsp cinnamon
1 tsp cloves
1 tsp nutmeg     and mix well. 
Note:  Make certain there are no lumps in the baking soda or powder before you mix.
Mix remaining ingredients in the order given:
2 cuts nuts (optional, but not according to my husband)
2 cuts raisins (optional, but not according to my daughter)
2 cups sugar
2 beaten eggs
1 cup of oil or melted butter
4 cups of flour* 
*Stop and check the dough at 3.75 cups, the dough needs to be somewhat stiff, but not so stiff that utensils stand upright in it. You can also try baking one cookie.  If the dough is just right the cookie will spread out a bit as it is cooking.
Spoon cookie dough onto ungreased (or parchment lined) cookie sheets and bake in a preheated oven at 350o ~14 minutes or until golden on top.  If they are not a bit golden/brown on top the flavor is not as good.  The recipe doubles perfectly. The cookies freeze very well (separate with wax paper). Enjoy!

*While you are ripening them, place them stem side down on a newspaper lined cookie tray at room temperature. It can take weeks for them to ripen, so I leave them in the garage.

Tuesday, December 1, 2015

Super Easy Hostess / Travel Gift 2.0 - Travel Bag for a Wrap

Post Part II of easy hostess / travel gifts made from vintage linens.  

When I travel I like to bring along a wrap, especially for airplane flights. 
I don't want to wear the wrap all of the time and having a balled up wrap in my purse or carry-on is a recipe for a wrinkled and snagged disaster.  Vintage linen bag to the rescue!  Some of those smaller hand towels and dresser scarves are just the right size to make a wrap case.Making the casing is as simple as sewing two to three seams.  The instructions are the same as on the first post. 

Fold the wrap into a long double or triple layer. Make it about the same width as a small collapsible umbrella.  Then roll the wrap into a tube.  Rolling decreases the wrinkling and makes it easy to slide into the tube shape.  Check the size against the linen you would like to use for the tube. 

You can see here that the tube not too tight, but the friction of the two fabrics together will keep the wrap from sliding out. 

Ideally the wrap will slide in past the opening an inch or two to provide the most protection.

Want to know the super unexpected bonus?  When the wrap is in the casing it can be used for neck support.  Got to love dual duty.

I don't know about your thrift/charity shops in your area but in San Jose, CA, I see pashmina scarves for under $5 all the time.

I take them home and wash them in the machine (seems wrong, I know) and they almost always turnout fine, perhaps a bit more felted. So with an inexpensive piece of vintage linen and a thrifted pashmina you can make a wonderful gift.

Part three of the travel set to be posted soon!

Happy Upcycling,  Michelle

Friday, November 27, 2015

Clever, Charming and Easy Hostess Gift - only 3 seams!!!

Are you like me - with a stash of vintage linens you could not resist but you aren't sure what to do with them?  (or you could get your hands on some)...

And you would love to give homemade gifts but don't feel you have the time?  I have a solution:


One day when I was packing for vacation and putting my shoes in a plastic bag for the suitcase it occurred to me that there was an opportunity to use something much nicer to hold my shoes.

So I rummaged through my vintage linens and realized that some of the dresser scarves were ideal candidates for shoe holders. 
This dresser scarf looked promising.

I checked the sizing out by placing the shoes on top.  Just enough width, detectable by the appearance of extra room on both sides of the shoes.  A bit long, and long is fine, width is critical.

Press the dresser scarf well as wrinkles will distort the shape.  
Then pin the sides and mark the center line.
This is important - start with the middle seam, and begin sewing from the open end.  The reason for this is so that the open ends don't end up at different lengths.  Unless you have a walking foot on your machine all the time the feed dogs will shift the fabric slightly as you sew.  

Then sew the sides closed, also starting from the open end.  Clip the threads and you are done.  Only 3 seams!!!!  Yeah!!!

Slip the shoes in.  

Wouldn't that be much more pleasant to pack and unpack?  
Mine bring a smile to my face every time I use them.  

When I've given these as gifts the recipients are delighted.  
With all the different sizes of vintage linens it would be easy to make these for men and children's shoes too.  

Happy Upcycling!  Michelle

P.S. - Check out Paganoonoo upcycling clothing patterns here.


Thursday, November 19, 2015

My New Favorite Patti Blouse

I have a new favorite version of the 

I found a wonderfully soft dress shirt in this lovely pale aqua 
and fell in love with the texture, drape, and the color. 
Then I was lucky enough to find a silky soft cotton skirt lined with SILK! in complimentary colors. I know, Amazing.

So I substituted the skirt for the back panel and left in the yummy silk lining. 

The double collar added a third fabric.

Then I went crazy with my fabric scraps from other projects and embellished the front with a collection of circles sewn on with free-motion stitching, leaving off the pattern pocket and stripe.
As you can see I left the back section (skirt) quite long making the blouse a bit dramatic and eye catching.

And here I am wearing it with an upcycled skirt.  The skirt was originally a Britex knit fabric blouse I made from that never quite fit right.  The fabric was quite expensive so I wanted to re-use it.  Turned out all I needed to do was cut off the shoulders, sew up the side seam closing the arms holes,
and add a bit of elastic. 


 For size reference I am a truly average American woman, 5' 6"and a size 14.  I am also pear shaped. This blouse is quite loose (I like loose) and would accommodate a much larger and taller person.  

Happy Upcycling!  Michelle

Patti Pattern available for purchase here

Wednesday, November 18, 2015

Puyallup sewing expo, Paganoonoo will be exhibiting!

I received great news!  I will be teaching a class on upcycling at the National Sewing and Stitchery Expo in Piyallup WA the last weekend in February 2016!  Expo website  Paganoonoo will also have a booth selling patterns and perhaps kits.

 If you haven't been it is a huge and amazing show with 4 day roster of classes running non-stop and every sewing supply you could possible imagine and many you may never have heard of before.  I hope to see you there!  More details come come as I learn them. 

Friday, November 6, 2015

Magical Boro Inspired Jean Jacket with Belt Closure

Hello, I'm Michelle Paganini a fashion designer addicted to "upcycling", transforming existing goods, such a clothing, into something more desirable than the original materials.


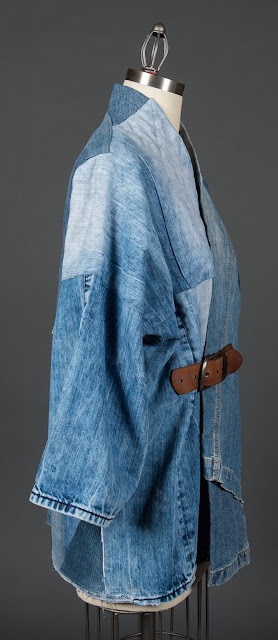
This upcycled jean jacket was inspired by Japanese Boro clothing.  I find the utilitarian nature of the garments appealing and the patchwork and repair process fascinating.  

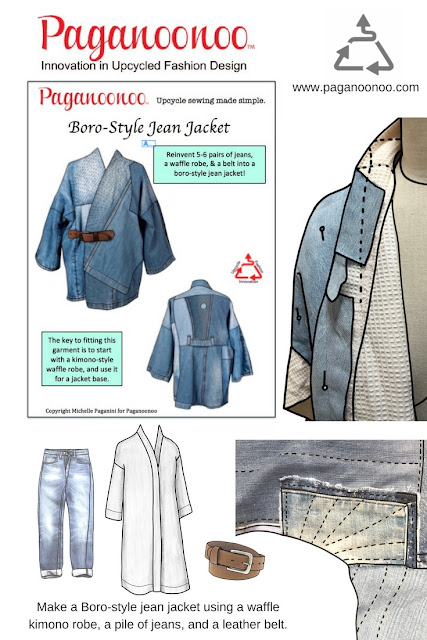
I ran across a white waffle robe with a Stanford University logo and thought it would be a good foundation for building a kimono jacket. I did not have garments that need extensive repair, but did have jeans in different stages of life.  I decided to use them to build this Boro inspired jacket by piecing them together on top of the waffle robe. 

The rugged nature of the jacket called out for a complementary closure so I used part of a man's belt. 

Read more about the process in the original post

I'm featuring the garment again because my husband George 
just took professional photos from all sides. 

The thing that is amazing, even magical about this jacket is that it looks good on such a wide variety of people.  I wish I'd taken pictures of all of the men and women who have tried it on and it seemed to look just right on large, medium and small people of both sexes. I will get some pictures of it on folks in the future.

I really love the subtle color blocking from the 
different shades of the jeans.


The circle on the upper back is to hide an ugly a grease stain. 
I always try to turn a stain into a feature, LOL.
Here is the inside front of the jacket.  The original waffle robe lining only extends part way down the sleeve.  This is so the bottom of the sleeve does not become too stiff and retains fluid movement. A pocket was added using an original jean back pocket.  The red stripe is bias tape used to finish off the join between the lining and jacket facing.
Here is the inside back.  You can see all of the sewing
attaching the pieces and quilting the sections.

Look at customer examples here.

Upcycling instructions available for this jacket!!


My goal is to make upcycling designs flattering, simple to make, and accessible to home sewists! 

Happy Upcycling!

Michelle

Wednesday, November 4, 2015

Upcycled Holiday Gifts

Some of you have already completed your holiday shopping. Some of us have barely started.  I often have an itch to make the presents but rarely can follow through. However, this year I stumbled on...
embellishing a scarf as a fairly easy upcycled present for a woman, man or child.  

My local thrift stores seem to have a wealth of pashminas, wool, cotton, and cashmere neck scarves.  I check every time I go and have built up a collection.  

For embellishment, I've been screening the skirts (and some garments) for designs I can cut out with pinking shears and then hand or machine sew onto the scarves. 

As usual, I wash everything when I get it home (regardless of care tag instructions) and if it survives I use it.

In this case I found a cotton skirt with beautiful embroidery on a rich purple background.  I've already harvested some of the embroidered bits.
Here you can see the bits I added onto a cashmere scarf.


I sewed each piece on by hand with a running stitch.  I matched the thread to the color of the scarf so that the stitching on the back side would barely show. The purple pops on the pale green background. 

This scarf reminds me of painted easter eggs.  It sold in August at the San Jose Quilt Museum gift shop.  I hope the new owner is enjoying it!

Tuesday, October 27, 2015

Dealing with stains - A Paganoonoo Patti blouse with a trick

These two starting garments may not look like much, but both are beautifully soft.  The embroidered one is linen and the other cotton. The linen has a slightly iridescent quality.  The cotton one simply will not wrinkle. 

One of the things I love about upcycling is that you know exactly how the fabric will behave because it's already been cleaned many times. 

The color combination is a subtle play on this one shade of green.  

I liked the combination so much that I broke my three fabrics rule and just used these two starting garments.  

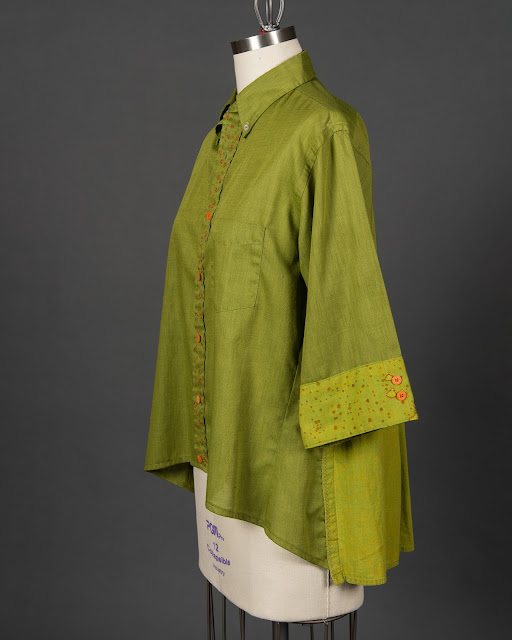
I decided to upcycle the garments using the Paganoonoo Patti Pattern as I wanted to show off the embroidered linen in the back panel. 


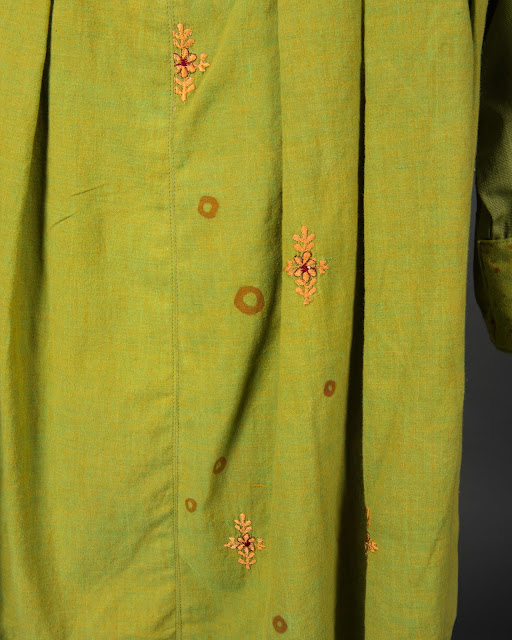
  What you don't see is the stains on the linen garment, grease spots and slight bleaching in some parts. I decided to make a feature out of the problems. 


I decided to embroider a running stitch around the lighter spots. The shapes are organic and I really like them as a "feature". 

The color of embroidery thread is deliberately chosen from the other side of the color wheel to create excitement. I added a couple non-functional buttons for interest.  


I also used fabric pens to add in dots, making it more like a patterned fabric. 


The same (upcycled) buttons are on the front.  I did not have the smaller size buttons (collar) so I used new thread on those buttons to tie in the color. I also repeated the dots down the placket.

The grease spots are hidden in plain sight by wide circular bands around the stains using the fabric pen. Looking closely it is really impossible to see the difference in color between the stained parts and the rest of the fabric. 


Overall I think I ended up with a much more interesting garment than it would have been without the stains as features.  Plus I really ended up with a third fabric through the embellishment. 
Happy Halloween!


P.S. - Check out Paganoonoo upcycling clothing patterns here.