Sunday, June 30, 2013

How to join the "Fashion Upcyclers" group located in the San Jose, California area


Here is the description of the Meetup group I formed:

"This is a group for people who are interested in the "upcycling" fashion movement, meaning we start with existing fashion (clothing, shoes, jewelry, handbags, etc.) and transform these items into something wearable, better than before, rather than buying new retail goods.

Several years ago I found out the fashion industry is one of the top contributors to global warming.

This prompted me to made a commitment to forgo retail shopping (okay, not for undies) and

1) buy only directly from artists, or

2) sew for myself, or

3) buy used clothing.

I've been about 85% effective in meeting my goal and as a result I've become very good at upcycling used garments & it has turned into a very fun and rewarding game.

Our members share ideas, examples of their work, resources they've found, and events relevant to our interests."

We now have 8 members!!!!!  Our first meeting is July 20th.  Join us...
http://www.meetup.com/Fashion-Upcyclers/

Monday, June 24, 2013

New MEETUP group formed for Fashion Upcyclers

I formed a new MEETUP Group!!!   "The Fashion Upcyclers South Bay" because I would love to connect with other people interested in upcycling clothing.  So cool.

Wednesday, June 19, 2013

itchy bit in new garment

More wardrobe problems...

I purchased a new bra yesterday and put it on to wear it this morning.

It fit well yet after several minutes I noticed an irritating scratchy bit at the edge of the cup.  The thought of living with that irritation all day was unacceptable. Returning the garment seemed like a frustrating waste of time.  
 
I suspected that the problem was microfilament thread - clear thread like fishing line, only thinner.  Manufacturers use this type of thread because there is no need to match the fabric color. This thread has sharp ends, therefore each clipped end is scratchy. I've noticed that it is frequently used to sew labels into the back of the neck.

My solution this morning was to take a new emery board (fingernail file) and run it over the scratchy area.  It worked! The emery board rubbed down the sharp end of the thread. I wore the bra all day with no problems. 

This solution works on the inside of a garment but beware that it will rough up the fabric. Use caution, if you have a very thin fabric then damage could show on the outside too. 

Michelle 


Tuesday, June 18, 2013

Pants that unzip themselves, Arrgh!

The past several months I have been increasingly aware of those little wardrobe irritants that keep me from wearing certain garments. 

I've diligently been working on fixing the problems or getting rid of the offending garment.  

Case in point, a pair of black jeans I bought around Thanksgiving last year. Slowly (and perhaps with a slight weight gain) the zipper has started unzipping itself when I sat down, arrrgh!!  

At first I compensated by wearing longer shirts and re-zipping the jeans as discretely as I could all the while accompanied by that uneasy feeling that somehow I was going to be found out. Or maybe I would fall down, my shirt would fly up, and I would be laying on the ground with my pants still buttoned but with my undies showing and a crowd of people standing around me.  

I let my jeans linger for a long time in the laundry basket in protest, however I only have 2 pairs so something had to give.  I washed them, put them on, and rediscovered the problem.  

I had an idea.  Last week my friend Patti gave me her mother's notions tin and it had some big black hook and eyes... and...

My friend Patti
most of the expensive/nicely made pants I have owned have a built in safety feature: two buttons for closure, one on the inside to relieve some of the strain from the main button, and as a safety feature if the main button breaks. 

Hmmm... applying this same principle, perhaps I could alleviate some of the strain on the top of the zipper by forcing the top of the jeans to pull closer together with the hook and eye.

SUCCESS!!!   Today I wore my black jeans and they did not unzip themselves even a little bit.  I just got a wardrobe staple back with 10 minutes worth of sewing and a gifted vintage notion.

Thank you Patti!


Tuesday, June 11, 2013

I received a scholarship!!!!

 Tonight I was invited to a meeting of the South Valley Quilt Association. Morgan Hill, California where I was awarded a scholarship to study fiber arts.  Yahoo!!!  

Thank you ladies and gentleman of the Association and thank you Ronda Chaney (Canada College Fashion Department Chair) for encouraging me to apply for this scholarship! 

The scholarship money will be applied three ways:

1) Tuition at Canada College in Redwood City, CA for summer and fall 2013 (already registered)

2) A muslin covered dress form from PGM (watch out for new draped clothes!)

3) A Craftsy class, Hand Embellishing Knit Fabric, instructor: Natalie Chanin of Alabama Chanin fame. 

Oh Boy, Oh Boy, Oh Boy!!!!!  It's like Christmas and my birthday all in one.

Thursday, May 30, 2013

Tally 28may13

Tally for Yesterday:

Thrifted:  dress 2012 (re-hemmed), sweater 2013, full slip 2012 (re-hemmed)

Gifted: none
Bought retail: Cole Hazan red patent leather loafers

Bought from artist: organza rose pin, pendant

Made: earrings

Sunday, May 26, 2013

On a roll

Okay, I know, nothing for a month and BAM! Three entries.  TGBM Tally today:

Thrifted: Khaki Cords (2013) , Linen hoodie (2013)

Gifted:  MOP and Red Coral bracelet

Bought Retail: Born shoes (2009?), favorite hoop earrings circ. 1982/3

Made: Nada

Fashion Collars

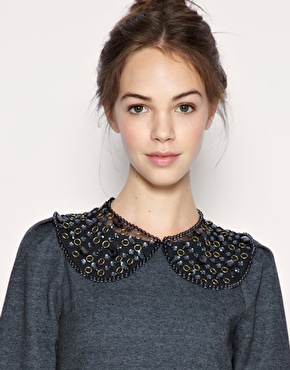
I just ran across something I have not noticed before, an apparently hot trend of "Fashion Collars".  Separate collars that you add on top of the same-old same-old garment to dress it up.  

Great idea.  Some of the examples I saw actually looked good, like this one:

More available here: Fashion Collars

Some of the examples I saw looked fairly simple to make. Hmmm. 

One. More. Project.

$300!!

Here is me, happy as a clam! 

My garment did very well at the Discarded to Divine auction, it was one of  6 featured on a live model!!! 

It also sold for $300!  I found out later from a friend of mine that she knows the woman who purchased it - she told my friend it was her favorite piece in the show.

I was so inspired by the garments, jewelry, pillows, etc. other people designed.  The level of creativity is truly amazing.

Since then I've been embellishing a dress I picked up at Goodwill.  I love the cut but the color is not the best on me, so I've been using red pearl cotton chain stitching to add color.

My goal this summer is to buy a plethora of thrift store dresses and doll them up. I'm not a shorts type of woman and I want to be cool and comfortable : >.


Sunday, April 14, 2013

Here is the front of my Discarded to Divine Entry.  I started with the jacket and used a cream fleece top and a pair of cream pants to add the circles and continued the embellishment with button shell buttons and DMC embroidery thread.  
 The design wraps around the back. I made the outline embroidery directional so it seems that the circles are swimming in a circle around the garment. How long did it take?  Hours and hours.  It will be auctioned off this Tuesday.  

Monday, April 8, 2013

My garment is on display this Friday April 12th at the deYoung Museum, San Francisco!!

There is a free preview of "Discarded to Divine" entries for three hours on Friday April 12, 5:30pm - 8:30pm.

People make entries by recycling existing used clothing and household goods to create "upcycled" clothing, jewelry, hats, pillows, etc.  The level of creativity is AMAZING!  

I've attended the deYoung exhibit for the last 4 years or so and I am always impressed and amazed by what people have created.  You can go on the website and see entries for previous years.

Discarded to Divine is a fundraiser for Saint Vincent De Paul.  http://discardedtodivine.org/

 I've been wanting to enter and this year I did! I created a one garment from three.  My foundation was a black blazer and I used parts of a cream colored jacket and cream pants to embellish the jacket.  My garment will on display

If you are in the Bay Area please come join us. Parking is a bit tough so come early.  Pay parking is underneath the museum.

 There is another event:
A $75 a ticket auction the following Tuesday - details on the website. I will be there too.

Pictures will follow after the event.

Monday, December 17, 2012

Vacation wardrobe via Goodwill

We went to Mexico on vacation last week which was wonderful!

Flash back to two weeks ago: I'd been tied up with a family emergency, then Thanksgiving, then sick and then work!  Was I ready for vacation packing - NO! I had purged many of my summer clothes in August leaving me little to wear in a tropical climate; I thought I'd sew then did not get it done. Off to guess where? - Goodwill.

I found a bounty of summer dresses!  And white shorts that fit! And a vintage full length bateau back Hawaiian dress (below) under $10. For less than $100 total had a selection that dressed me for the whole week.


We did not want to leave!  Here is the table set for a party with 80+ of our closest friends.


Here I am in a beach wrap I've had for years.  I'm holding a Parrot Fish. I was an amazing blue color.
 

Monday, November 12, 2012

Perfect fit panties

It has been sneaking up on me. I've reached that critical point where the number of panties I have that I'm still willing to wear are too few to last my normal laundry cycle. Ugh!

I went out to Nordstrom rack and picked out a selection - only one of which was remotely passable so..... I took apart a pair of ragged favorites and made a pattern and then two practice pairs.
I think I have the pattern just right so I can make an adundance this week. Having a large number of perfecting fitting panties seems like such a luxury. 

 Bonus: I can use up a really nice knit from Emma One Sock that turned out to not to work so well for blouse material. 

Thank you Lynda Maynard for the Lingerie class at Canada College! 

Wednesday, November 7, 2012

Christmas gift idea using felted wool

Felt slippers from an old sweater pattern  

Oh boy oh boy. I have a 100% lambs wool sweater I picked up and felted in the washer that would make wonderful thick slippers. What an easy idea for Christmas gifts.  I looked at the pattern (see link above) and think I will trace my own feet and adjust the top pattern to match for a trial run.  

I bet these would look really good hand sewn with buttonhole twist thread and a blanket stitch. If you haven't sewn by hand for a while it goes faster than you think it would.  Just in time for cold weather plus wooden floors.

P.S.  I used the wool this weekend to make hand warming fingerless mitts for a friend returning to the Jersey Shore to distribute.  I'll be on the look out for another sweater.

Monday, November 5, 2012

sewing

Yesterday I finished sewing a new cowl neck knit top with some wonderfully soft knit fabric from Britex (aka Fabric Mecca in San Francisco).

It was my second one from this pattern and I had adjusted the pattern after the first top, taking in the sides and shortening it by a couple inches.

What I am coming to realize is that every knit behaves differently. The first top was a heavier knit so probably hung longer because of the weight.  However this new top is very lightweight knit and seemed too short! It also did not sit nicely across my hips/butt in the back - pulling across a bit.

So.... I added a godet (triangular shaped wedge) in the lower center back creating a bit more room.

Lucky me, I had a long enough piece of fabric to add a two inch band at the bottom.  I actually like the effect of having a banded bottom on such a lightweight fabric as the bottom hangs a bit better with the extra weight of the seam.

There is one thing left to adjust.  The pattern is a kimono sleeve and makes my shoulders look very sloped.  Time to revive the 1980's and add in some light shoulder pads.  I tried out a pair I had on hand that are too padded and I can still see the shirt will look better with pads AND bonus - they will balance out my hips a bit.

Ronda taught us how to make shoulder pads in tailoring (at Canada College) so I can pull out the class book and make my own.  My shoulders roll forward from years of leaning into computers so I need very little padding on the front and a bit more to balance out the back of the shoulder.

Once the pads are complete and installed I will post a picture. 


Friday, November 2, 2012


Although I continue to tally my outfits every day it has been a long, long time since I have posted a tally.   Back to my roots!

Thrifted: Dress (2010?), Jacket (2012), Shoes (2012)

Gifted: None

Bought: None

Made: Earrings

The jacket is made from a knit wrap dress.  


I loved the fabric and the dress was the right size but I think the reason it was given away was that the neckline gaped open and would not lay flat when the dress was in the "wrap" position.

The front sides of the dress were symmetrical so I tied if front and center.  I loved the way it made a long v shape down from the neckline, however it looked like a house robe.  What to do?  

It is difficult to see in this picture but I took three tucks horizontally across only the fronts below the tie.  It make the front billow out a bit (see above) and also creates a step down front to back.  

The effect is more striking in person.  It is reminiscent of the cut of some clothing in 1925 (below.)
deep v-neck - check
drop waist - check
wider at hip - check 
bow - check (theirs - in the back)

Sunday, October 28, 2012

Celebration of Craftswomen Fort Mason Center — Nov 24th through Dec 2nd

One of our favorite shows in the San Francisco Bay area is the:
 
Celebration of Craftswomen
Fort Mason Center — Nov 24th through Dec 2nd


You may recognize this piece of artwork in our hom
"Portrait of the Artist as My Husband" by Justine Tot Tartasky, which we purchased at the show a few years ago. 
 

The Celebration of Craftswomen is one of San Francisco's largest holiday fine crafts retail fairs and the largest event celebrating the craft of women in the nation. Shoppers looking for unique substitutes to mass-produced goods are delighted with the original hand-made offerings at the Celebration of Craftswomen.

For 34 years, the fair has been part of the socio-political movement -- led by female artists -- that offers environmentally conscious and economically sustainable alternatives to mainstream consumption. Featuring imaginative and innovative work by some of the country's best female artisans and fine artists, quality has always been a hallmark of this highly-anticipated annual holiday show.


The event is sponsored by and is a benefit for The Women's Building, a community service center serving women and girls in San Francisco.


Saturday & Sunday, 


November 24 & 25
 December 1 & 2

10:00 a.m.-5:00 p.m.


$7-$9 ($12/two-day pass)


More Information: (650) 615-6838


We typically go on the Sunday in November mid-morning and then eat at Greens which is in the same complex.  Hope to see you there!

The plan: modifying a mens button down shirt

Today I am working on modifying a XL mens red striped button-down shirt into a girly over-sized casual shirt.  I crave a closet full of casual shirts to wear on non-work days with jean or pants.  

I've completed a blue one already, slightly different than what is described below. It is in the washer right now so I will post a photograph later.

So far I have:

1) Released the pleat on the center back yoke

2) Starting with the fabric released at CB yoke I folded in pleats  (about 6 of them ~ 8" across by ~10 inches down) hiding the black&cream stripes.  I sewed down the pleats so there is now a patch that is just red.

3) I tested out what the pleats would look like anchored by mother-of pearl buttons top and bottom - excellent!  I will sewn them on later.

4) I cut off the cuffs

5) I cut out the side seam from the bottom hem to the end of the sleeves

6) I've pinned out pleats under the bust, this time with the black&cream stripes highlighted rather than hidden

7) I pinned in a dart at the side seam to meet up with the top of the pleating

8) Cut off the curved "tail" in the front so the shirt is straight across.

So...  I now have some shaping (via pleats) mapped out. The rest of my plan is to:

9) Add ~ 4" by 5" of pleating on the outside of the sleeves, midway between the shoulder and elbow. Again I think I will highlight the black&cream stripes. 

10)  Hem the front section

11) Pin together the side seams on the sleeve and bodice removing excess fabric while still achieving a nice balanced look.  

12) Sew the arms and part way down under the arm, leaving room so I can...

13) Add the pieces I cut off the bottom front as decorative inserts between the side seams (bottom half.)  

14) I will rotate the inserts so the striping is horizontal and make them hang about 1.5" - 2" lower than the front

15) I hang the back 1.5" - 2" lower than the godet pieces so I end up with three steps down moving front to back.

16) Hem the sleeves 

17) Sew on the decorative back buttons

18) Photograph it, post it, and wear it!


Tuesday, October 16, 2012

Sleeves or pockets?

I was cruising a thrift store yesterday (yes again) and found a couple skirts with smocked waistbands.  I saw two possibilities for reusing the skirts:


1) sleeves with a smocked cuffs (dramatic!)

2) extra long external pockets

I have a Marci Tilton skirt pattern, Vogue 8499 view A, I've made twice that has just such pockets on both sides of center front. I'm picturing the smocking on the top of the pockets. (again dramatic!)


 Also, I bought a black top with some white embroidery that I also think would make a great pocket on this skirt - embroidery side up. 

So I looks like I might have a few more of these skirts soon or something else dramatic.

Sometimes the sheer possibility of choices is even more fun than the reality of execution.
 

Sunday, October 14, 2012

Designer Sale at Canada

I thoroughly enjoyed the Designer Sale at Canada College. There must have been 40-50 designers booths and I felt like I was in the best boutique in the world.  

You may remember that I had $300 in my pocket from relining Caryl's tuxedo. It was particularly fun to look knowing that I could buy too.  I toured the whole show and settled on two items.  

The first item is a lower calf length indigo died skirt that comes in a little at the bottom like a balloon skirt. It has ties on the inside so I can scrunch it up. It is from 7 Hands Design of Saratoga, CA.


 I love the heavy weight of the fabric and think it will be great with winter boots.  One problem when I wore it this week - too full and gathered at the top!  It made me feel as though I looked 15 lbs heavier around the waist.  

Hmmmm.... I opened up the top of the skirt and removed the stitching and elastic, then took in the side seams considerably and also created two darts equidistant from the side seams to take in the waist even more.  The top of the skirt now fits closer to my actual waist size. I added a zipper so the skirt no longer needs elastic in the waistband.

The second item was a pair of black ankle-length heavy weight cotton knit pants.  Very arty and so versatile I feel like I just doubled my winter wardrobe as I can wear them with all of my arty jackets.

 I bought them from JANE MOHR DESIGN'S / DRESS TO KILL / CAZ KNITWEAR and let me tell you I could have bought every single item she had and been very, very happy.  Here are some examples:


I spent the last of my change at

Missing a Few Buttons, Santa Rosa, CA 

and Park Bench Patterns 

Add caption